The Cellar
Cellars are below ground level and so they are exposed to the dampness that
surrounds them.
The dampness that seeps into the bricks is stopped from rising into the ground
floor walls and above by a waterproof damp-proof course just above the ground
level.
Its a nice thing to do to waterproof the cellar and plaster it. If you have
your workshops there, then the tools no longer get damp. Or perhaps you fancy
building a cinema in the cellar?
Just plastering over the walls wont work as the dampness will seep through
the plaster. So, the challenge here is to find a way of waterproofing the walls,
and then plaster over that.
We must avoid putting material over the damp-proof course, as moisture would
use this as a bridge, and rise into the upper walls.
Waterproofing
For waterproofing, we use a bitumenous paint (like thin underseal), but putting
this straight onto damp bricks and mortar is ineffective - old mortar is too
sandy to be solid, and quite quickly the tar hardens, and splits where its foundation
is not very solid. This happens when the mortar gets a good soaking in very
wet weather, the sandy mortar expands, and together with the pressure of moisture
behind the hardened tar, it cracks.
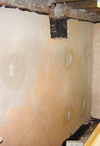
Concrete render
So we need a more stable foundation - Concrete. The walls have to be 'plastered'
with ~1cm thick concrete. It does not particularly matter how flat or uniform
the concrete render is - the plaster will take care of that later - but if it
is too thin (say 1mm) it will crack and be ineffective. If it is thick enough
then once it sets like stone, it will make an excellent foundation to paint with the
tar. It is quite hard work mixing the concrete and rendering the wall with it,
and at the time its hard to belive this damp sandy stuff will end up solid -
but it does. If you have access to a concrete mixer that will help a huge amount,
because otherwise you will be tempted to skimp on concrete and it may well be
too thin to be effective. If the brickwork has some coat - like paint for example -
then be sure to remove it, or scratch it, otherwise the concrete may not 'stick'
to the brick, and may later come away en-masse, either completely, or enough to make
a hollow sound when you tap it. One caution - be careful only to go upto the damp-proof course,
and not to bridge across it.
 The
waterproof coat needs to go down to the floor, and preferably tie in with whatever
waterproofing layer is in/under it. One way to do that is to dig a small trench
into the floor concrete around the bottom of the walls, say 1" wide, 1"
deep. Then when we concrete render the wall we fill that trench too. You can
use waterproofing compounds in the concrete which helps prevent ingress.
The
waterproof coat needs to go down to the floor, and preferably tie in with whatever
waterproofing layer is in/under it. One way to do that is to dig a small trench
into the floor concrete around the bottom of the walls, say 1" wide, 1"
deep. Then when we concrete render the wall we fill that trench too. You can
use waterproofing compounds in the concrete which helps prevent ingress.
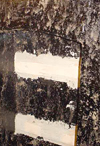
Once the concrete is set hard (give it a week or so), we paint the tar (bitumenous
paint) on. I used three coats, letting each dry hard. (If it stays liquid in
the can, then presumably a coat that has not dried will stay wet underneath
the next coat; so we let it dry).
The final coat gets sand thrown at it so when set, there is something for the
plaster coats to grip (key) onto.
I waited until it had all set, and there had been some heavy rain so I could
spot any leaks and fix them up. In one case the concrete render had not been
very thick (it was about 1mm), so I pulled that off, made a thicker chunk of
concrete in that place, and re-tarred it, which then held fine.
Plaster
The rest is conventional plastering.
 |
If the levels are very rough, we put down a rough coat of
bonding to level out the worst parts. Then we setup dots and screeds, fill
in the rest of the wall with bonding coat and use the screeds to rule it
of, giving a flat surface, though imperfect finish.
We then do a finishing coat on this flat surface which provides the smooth
(glass like) finish. |
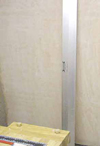 |
| The finished result... |
 |
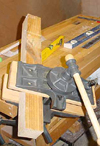
All finished and painted, which is all very satisfying, warmer and dryer. And finally, here is an interesting thing. An Emmert pattern makers vice. This one is an eastern copy... |
 |